26 Interactive Exhibitbook Basics
Overview
In this walkthrough, we will discuss the basics of working in Pressbooks by creating a mock-up exhibition page.
- Create a chapter (aka a page)
- Incorporate header text, body text, and footnotes into Pressbooks
- Add a table
- Add media (images)
If you’d like to follow along with this activity using the sample image and text pictured below, you can do so by duplicating text and image from the original page materials replicated at the bottom of this chapter.
Create a chapter
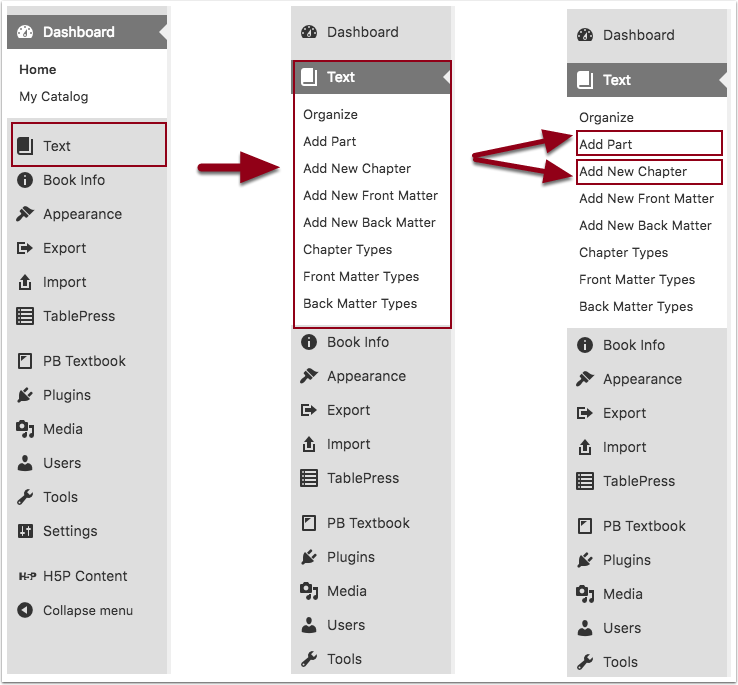
STEP 1: To add a new Part or Chapter, start by clicking Text on the left side menu. This opens up the menu tray for your text.
Today, you’re going to want to add a new chapter. (Click the “Add New Chapter” button.)
STEP 2: Give your chapter a name you will remember.
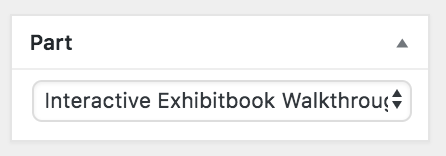
STEP 3: Make sure you’ve placed your chapter in the correct part of your book. To do so, look to the upper right-hand section of your screen for the “Part” dropdown.
*Note: it’s ok if you save your chapter in the wrong place to start with. You can fix this by editing your chapter again or using the organization pane. For more details about the Organization Pane, click this link.
Add a table
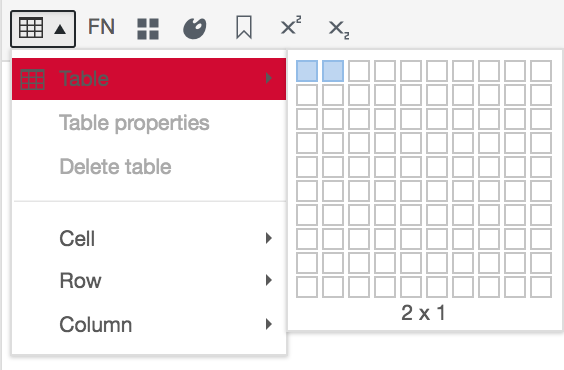
STEP 1: click the table icon:

STEP 2: choose a 2×1 table
STEP 3: Choose your border formatting.
Make sure the table you’ve just created is still “active.” (Click inside of your table.)
Click the table icon again and choose “table properties” > class = “no lines”
Create a footnote
You can make footnotes in two ways. One is by clicking the FN button in your visual editor. The other is by entering text between two bracketed footnotes segments:
For example:
![Inserting the shortcode "[ footnote ]" and "[ /footnote ]" in the editor](https://integrations.pressbooks.network/app/uploads/sites/57/2019/12/Footnote-shortcode-300x22.png)
Add media (images)
We will walk through how to incorporate images into Pressbooks in person during our session.
If you’ve not been able to make today’s training and would like to see a walkthrough on your own, this video contains an audio description of how to incorporate media into a text. (Scroll straight to minute 1:00).
This video describes:
- how to upload audio files and visual media into Pressbooks
- how to add a caption to an image
- how to attach a media category tag to a media file
- how to insert audio and images directly into a Pressbooks chapter
Final Outcome
(Excerpt from Creators, Collectors, and Communities)
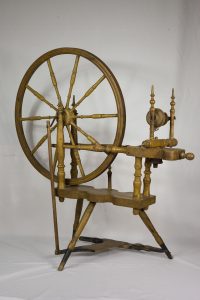 |
Spinning Wheel Norwegian Maker unknown, c.1840 Wood, metal Little Norway Collection, Gift of Scott & Jennifer Winner MHAHS 2014.050.0081 |
Spinning wheels were vital, if ordinary, objects that a family often brought from Norway to America. Spinning thread to make yarn was an important way that women contributed to family life during early immigrant days. Like the mangle board on display, these items were utilitarian. But by adding traditional Norwegian motifs and decorations, like the acanthus leaf carving seen here, another level of meaning is bestowed on these pieces that would become heirlooms for Norwegian-American families. Of unknown origin, this spinning wheel was acquired by Little Norway creator Isaak Dahle and displayed in the museum’s Norway Building for more than 80 years.[1]
- This is a footnote ↵
